

You need a great-looking flyer for your bake sale or a sharp post for your small business, but staring at a blank screen feels paralyzing. What if you could create something beautiful in less time than it takes to brew your coffee, with zero design experience? That exact idea is why millions ofpeople turn to one simple, powerful tool. Select the best Canva course.
This is the promise of Canva, a platform built specifically for non-designers. It completely removes the intimidation factor of graphic design by swapping complicated software for an intuitive drag-and-drop editor and thousands of professional templates. Imagine creating a polished resume or a stunning party invitation in just a few minutes, feeling genuinely proud to share what you’ve made.
Making that your reality is simpler than you think. This guide provides the exact roadmap you need to go from a total beginner to confidently creating your own visuals, exploring the best learning paths for your personal goals, and finally answering the big question: is a formal Canva certification worth it?
Whether your goal is to grow a brand, ace a school project, or simply improve your graphic design skills online, you are in the right place. It’s time to get past that blank page and on the path to creating visuals you’ll love.
What is Canva and Why Is It Perfect for Non-Designers?
Ever felt like you needed a graphic designer just to create a simple flyer or social media post? That feeling of staring at a blank page is exactly what Canva was built to solve. Think of it not as a complex program for professionals, but as a user-friendly online tool made specifically for people who aren’t designers. It gives you the power to create beautiful visuals without needing any special training.
The real magic of Canva lies in its library of thousands of ready-to-use templates. These are professional layouts where all the hard work—like choosing fonts and arranging elements—is already done for you. Instead of starting from scratch, you simply pick a design you like and customize it with your own text and images. In just a few minutes, you can have a finished product, such as:
- An eye-catching social media post for your business
- A simple, professional flyer for an event
- A clean cover page for a school report or presentation
Ultimately, Canva’s goal is to help you get your ideas out into the world quickly and confidently. You don’t need to learn complex visual content creation principles to make something that looks great. You just need to know how to click, drag, and type.
Your First Design in 5 Minutes: How to Edit a Canva Template
Ready to jump in? Let’s start with a common task that everyone needs at some point: creating a simple invitation. From the Canva homepage, you’ll see a large search bar right at the top—this is your gateway to thousands of designs. Go ahead and type “birthday invitation” into the bar and press Enter. As you scroll through the results, don’t overthink it; just click on a design that catches your eye to get started.
Clicking a template opens it in the Canva editor, which is your main workspace. It might look like there are a lot of options, but for now, we can ignore almost all of them. To change any words on the design, simply double-click on a line of text. A familiar blinking cursor will appear, just like in an email or a text document. You can now delete the placeholder information and type in your own details for the event.
With your message perfected, you might want to change the colors to match your style. To do this, click on an element you want to recolor, like the background or a decorative shape. You’ll notice a small color square appears in the toolbar at the very top of the editor. Clicking that square opens a color panel on the left, allowing you to select any new shade with a single click and watch your design instantly update.
And just like that, you’ve done it! You now know how to find a template, change the text, and adjust the colors—the three most fundamental skills in Canva. The design has your information and your preferred style, but you can make it truly personal with your own pictures.
Making It Yours: How to Swap Photos in a Template
A great design tells a story, and nothing makes that story more personal than the right photograph. Your template likely has a placeholder image, and swapping it out is incredibly easy. On the far-left menu of the Canva editor, look for the Photos tab. Clicking it reveals a massive library of professional, high-quality images you can use for free. Simply find one you like, then click and drag it directly on top of the existing photo in your design. Like magic, it will snap right into place.
But what if you want to use a picture from your own computer, like a family portrait or a product photo? For this, turn to the Uploads tab, located just above the Photos tab on the left. This is your personal media library. After clicking “Upload files” and selecting an image from your computer, it will appear in this tab. From there, the process is the same: just drag your newly uploaded photo over the placeholder, and your design will instantly update with your personal touch.
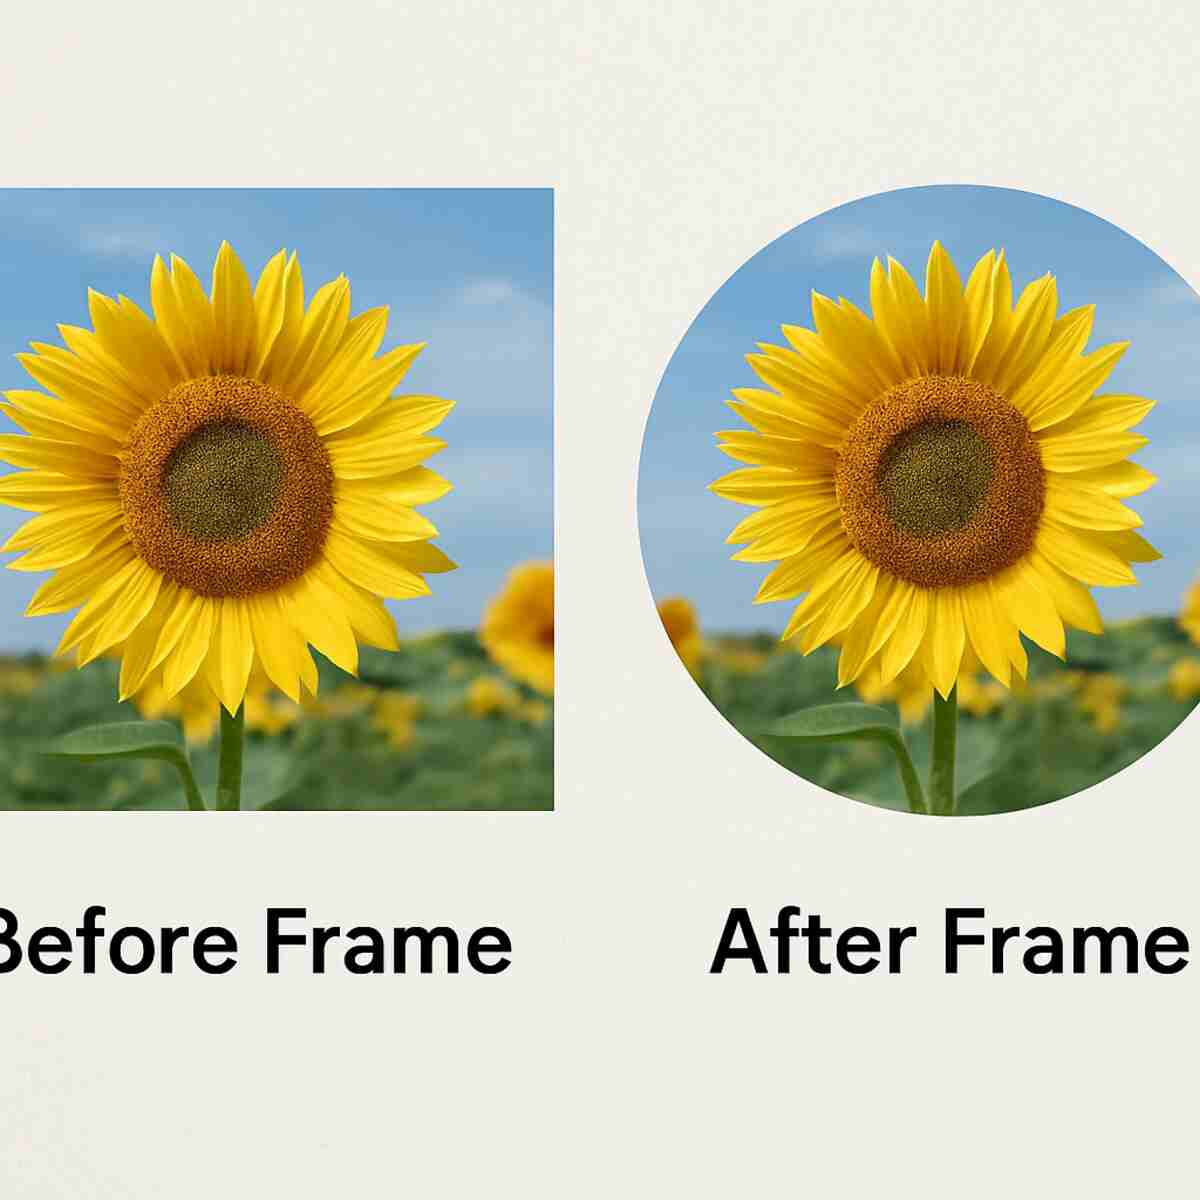
You might have noticed that some templates have photos in interesting shapes—like circles, arches, or letters. This is done with a simple but powerful tool called Frames. Think of a Frame as a cookie-cutter for your photos. You can find them by going to the Elements tab and searching for “frames.” Once you add a Frame to your design, you can drag any photo directly onto it, and it will automatically crop to that exact shape. This is a fantastic trick for giving your design a clean, professional look without any complicated editing.
With these skills, you can now add any image you want—whether it’s from Canva’s library or your own camera roll—and shape it perfectly for your design. That same “Elements” tab holds much more than just photo shapes; it’s a digital treasure chest of graphics to make your design one-of-a-kind.
What is the “Elements” Tab? Your Secret Treasure Chest of Graphics
While the Elements tab is great for photo Frames, its real power lies in the massive collection of graphics it holds. Think of it as a digital sticker book filled with everything from simple lines and circles to detailed illustrations and icons. Need to add a small star to a “Job Well Done” certificate or a simple arrow to point something out on a flyer? This is where you’ll find it. These small additions are what take a good template and make it feel unique to you.
Finding the perfect graphic is surprisingly simple. Instead of scrolling forever, the best way to navigate the Elements tab is with its search bar, located right at the top. Just type in what you’re looking for. For example, if you’re creating a birthday invitation, you could search for “balloon,” “cake,” or “party hat.” When you see one you like, just click on it, and it will pop right onto your design, ready for you to resize and move into place.

Once you’ve added an icon or shape, you’re not stuck with its default color. Just like when you change the color of your text, clicking on the new graphic will make a color box appear in the top-left toolbar. Click it, and you can match the graphic to your design’s color scheme perfectly. This simple skill of adding and recoloring elements is a huge step in making professional-looking designs. Beyond graphics, one of Canva’s most popular tools can instantly make your photos look cleaner with just a single click.
The One-Click Wonder: How to Instantly Remove a Photo Background
Have you ever taken the perfect photo, only to realize the background is cluttered with laundry or a distracting poster? It’s a common problem that can make an otherwise great picture look unprofessional, whether it’s for a resume, a product listing, or a social media post. You don’t need complicated software to fix this; in fact, you can do it with a single click.
This is where one of Canva’s most magical tools comes in. After you’ve added your photo to the design, click on it to select it. Then, at the top of the editor, click the “Edit Photo” button and choose “BG Remover.” In just a few seconds, Canva’s AI will intelligently erase the entire background, leaving you with a perfectly clean, professional cutout of your subject.
This one-click wonder is one of the most popular features in Canva Pro, and it’s a game-changer for making your designs look incredibly polished. By removing the background, you can place your subject on any color, pattern, or scene you want. After your image looks perfect, the next step is saving it correctly for online use or print.
How Do I Save My Design? Understanding PNG vs. PDF in Plain English
Once your design is finished, the final step is to get it out of Canva and into the world. But when you go to save it, you’ll see a few confusing options like PNG, JPG, and PDF. Choosing the right one is simple once you know the secret, and it all depends on one question: where will your design be used?
For anything that will be seen on a screen—like a social media post, a website graphic, or an image in an email—you should choose PNG. Think of a PNG file as a high-quality digital photo. It’s perfect for keeping text and logos looking sharp online. It’s also the only format that can save the transparent background you just created, which is essential for layering your image onto different colored backdrops. JPG is a similar option for photos where file size is more important than perfect sharpness.
If you plan to physically print your creation, you need a PDF. Whether you’re printing a resume at home, a flyer for a bake sale, or sending a professional presentation to a print shop, the PDF format is your best friend. It acts like a digital snapshot that locks everything in your design—fonts, images, and colors—perfectly in place. This ensures that what you see on your screen is exactly what comes out of the printer.
To save your file, simply click the “Share” button in the top-right corner of the Canva editor, then select “Download.” From the “File type” dropdown menu, just choose PNG for screen use or “PDF Print” for printing. Mastering small steps like this is the key to feeling confident in your skills.
What Is the Best Way to Learn Canva? Exploring Your Options
Now that you’ve seen how easy it is to create and save a design, you might be wondering about the best way to learn all the other useful features Canva offers. The great news is there’s no single “right” answer. The best path for you depends entirely on your goals and how you prefer to learn new things.
Think of it like learning to cook. Some people love experimenting with ingredients on their own, while others prefer following a specific recipe, and some want to take a full cooking class. Learning Canva is no different. You can explore, find quick tips, or follow a structured plan.
To help you decide, here are the three main learning paths most people take:
- The Self-Taught Explorer: This involves simply playing around in Canva, clicking on buttons to see what they do. It’s fun and free, but you might miss key features, and it can be a slow way to build skills.
- The Free Tutorial Hunter: This is perfect for when you have a specific question, like “how to curve text.” You can find thousands of the best free Canva tutorials for beginners on sites like YouTube or Canva’s own Design School to solve problems one at a time.
- The Structured Learner: If you want to feel truly confident and learn everything from A to Z, a guided Canva course is often the fastest route. These provide a step-by-step roadmap, so you learn the right things in the right order.
For many people, the best approach is a mix. You might start with free tutorials to get your bearings before deciding if you want a more comprehensive guide.
A Closer Look at Free Learning: Canva Design School and YouTube
When you want to learn Canva from scratch, the best place to start is often with the company that made it. Canva’s own Design School is a free library of articles and short video tutorials. Think of it as the official instruction manual for the tool. It’s perfect for answering specific questions like, “How do I change a color?” or “What does the Elements tab do?” Because this information comes directly from Canva, you can be sure it’s accurate and up-to-date, making it an excellent resource for any beginner.
For more project-based inspiration, YouTube is an endless well of creativity. While Design School teaches you about the features, YouTube creators show you how to use those features to complete a full project from start to finish. You can find thousands of helpful videos that walk you through creating everything from a bake sale flyer to a polished business presentation. Seeing someone else build a design is a fantastic way to pick up new tricks and discover what’s possible.
So, how do you choose? The most effective strategy is to use both. Turn to Canva Design School when you need to understand a specific tool, and search YouTube when you want step-by-step guidance on a particular project you have in mind. Together, these free resources provide an incredible education. However, if your goal is to have something tangible to add to a resume, a path that offers a certificate of completion might be worth considering.
Course Certificates vs. Official Certification
As you explore paid courses, you’ll often see a “certificate of completion” offered at the end. This is different from an official, industry-wide certification, like those for advanced software like Adobe Photoshop. For Canva, there isn’t a single, standardized test you take to become “Canva Certified.” Instead, a course certificate simply proves you successfully finished a specific training program. It’s a signal to others that you’ve invested time to learn the tool properly.
While it isn’t a formal license to practice design, this kind of certificate can be surprisingly valuable, especially if you’re a small business owner, virtual assistant, or aspiring social media manager. For these roles, being proficient in Canva is a key skill. Having a certificate proves you took the initiative to gain a solid foundation, which can give you an edge over other candidates who simply list “knows Canva” without any proof of training.
The best way to showcase this on a resume or LinkedIn profile is to list it under an “Education” or “Licenses & Certifications” section. You don’t need to overstate it; just be clear. A simple line item like, “Certificate in Canva for Social Media, [Course Provider], 2024,” is perfect. It’s a straightforward, honest way to highlight your training and commitment to developing practical skills.
Ultimately, a certificate of completion acts as proof of your effort and provides a tangible result from your Canva training. It validates your skills for roles where quick, quality design is part of the job.
Canva vs. Adobe Express for Beginners: Which One Should You Start With?
As you get ready to learn Canva, you might notice another big name popping up: Adobe Express. Adobe is famous for professional design software like Photoshop, and Express is their answer to Canva. It’s a powerful tool with great features, especially if you plan on using other Adobe products. Both platforms offer free versions, templates, and easy-to-use editors, so it’s easy to feel stuck wondering which one is the right place to start your journey into graphic design.
Think of the difference this way: Canva was built from the ground up specifically for non-designers. Its interface feels incredibly intuitive, like a user-friendly app, and its massive library of elements and templates is designed to help you create something beautiful in minutes without any prior experience. Adobe Express, on the other hand, often feels like a simplified version of a more professional tool. It’s excellent, but its real power shines when it connects with the larger Adobe creative world, which can be overwhelming for a true beginner.
When it comes to Canva vs Adobe Express for beginners, the verdict is clear. If you are just starting and your goal is to quickly and easily create great-looking designs without a steep learning curve, Canva is the winner. It’s less intimidating and more focused on getting you a fantastic result, fast.
Your Next Steps: A Simple Plan to Master Canva Quickly
Before, that blank screen probably felt intimidating. The thought of creating a “design” from scratch seemed like a job for professionals. But now, you know the secret isn’t magic—it’s a template. You can confidently choose a layout, swap out text and colors, and add your own photos to bring an idea to life in minutes. You’ve already taken the most important step from wondering to creating.
The key to mastering Canva quickly is building confidence through practice. Here’s a simple, 3-step plan to help you improve your graphic design skills online.
- Practice: Spend 15 minutes today recreating a design you like. This builds muscle memory without the pressure of being original.
- Explore: Open the ‘Elements’ tab and just scroll for 5 minutes to see what’s possible. Let the endless stickers, shapes, and icons spark new ideas.
- Challenge Yourself: Pick one real project you need—a birthday card, a social media post—and create it from start to finish this week.
Remember, you don’t need to be a “designer” to create beautiful things. You just need the right tool, a little curiosity, and the willingness to try. You’ve already proven you have all three. Now go create something amazing.